Thursday 30 August 2012

McCalls 5927 - 6PAC continued

I finished my blue work dress, McCalls 5927.  I've been working on it for over a month.  First I couldn't find the lining fabric, then once I found the lining fabric I couldn't find the fashion fabric I had cut out.  It finally all came together last weekend, and I managed to get it sewn up and lined over the last few evenings. 
 Here you can see more of the details, there are four pleats in the front and two darts in the back.  There are also pockets in the front, I did the pocket bags in a polka dot silk/cotton blend that I had in my stash, and it wasn't the best idea because when I sit you can see it. 
I like the dress, the fit's not perfect, I did a muslin, but I didn't pick up on the fact I needed a small FBA and the armholes are too big.  I'll leave this version alone, but when I make it again I'll fix it. 

 The back has a slit, which I think seems kind of cheap.  I'll definitely either remove it or put a vent in my next version.  I guess it's kind of lazy sewing.  I put the zipper in by hand.  I think I'll be wearing this alot, and I didn't want to deal with an invisible zip breaking.  Next time I may try a lapped zip, or move the zip to the side. 
Here's the side, you can see that the armhole pulls a bit in the front.  Definitely better than RTW though. 
Overall I'm pretty happy with the dress.  My sewing skills are getting better.  I still have a long way to go, but I don't think this screams 'homemade' (except the pockets, oh well). 
The lining is really comfortable, it's not sticky or crinkly like most of the linings that I use (I don't think it's actually a lining fabric, it was expensive, and is quite pretty)
This was item #2 of my Spring 6PAC, At two a month I might actually get through the set before Spring is over.

Monday 27 August 2012

Craftsy Couture Dress - wedding outfits


My brother got married in June, I've been waiting (not so patiently) for some photos from the wedding, but as none seem to be forthcoming I thought I'd put this post together anyway. 

In February I decided to make my dress for the wedding, following Susan Khalje's couture dress course.  I thought it would be a good way to pick up new skills, and it far exceeded my expectations.  As a novice, I learned so much from the course. 

I had picked up a gorgeous medium weight silk-cotton blend last year, and I knew it would be perfect for the dress.  I underlined with silk organza, and lined with china silk (both ordered from Dharma trading).  The dress itself is nothing special, I used the pattern that came with the course, Vogue 8648, the sleeveless, slim skirt version. 


I think I did a pretty good job fitting the front, but the back was not as good.  I have lost some weight since the wedding, so I think it fit me better back then.

I used swarovski seed beads in pewter to accent the hand picked zipper.  The dress was fairly plain and I wanted a little extra oomph.
The dress took a _really_ long time to sew.  Most of the techniques were new to me, and I estimate that I spent 60-70 hours on the dress.  At the same time I was making vests and pants for the three ring-bearers / junior ushers.  Two of them live across the ocean from me so I had to mail trial versions (yes multiple versions) to get the fit right.  I got a great deal on a British super 100s lightweight wool suiting.  It was a dream to sew.  The vests were fully lined and had real welt pockets (my first time doing welt pockets), but for the pants I ran out of time, and did fake fly fronts for the two littlest boys. 
I left my son's outfit behind, so all I have is this iphone picture from my sister:
This was well into the wedding, he's working on a chocolate sucker.  I made his backpack as well - but not specifically for the wedding :)

Sunday 26 August 2012

W.I.P. and more Macaron pics

I'm sewing!  I've been working on this for two weeks, I have about three days of hand sewing left, and I'll be done!  A day for me is about 1.5 hours of sewing, generally in the evenings after my son's asleep and laundry has been folded.  Here's a quick pic:

 In the meantime, I got Mr. RP (reluctant photographer) to take some shots as we were out and about today.  With a two-year old, we generally spend our days at some playground or another, so I expect there will be lots of playground shots in the future.  My Macaron is very comfortable, but it's not ideal for playground play.  My son was quite disappointed that I could not see-saw in it.


Tuesday 21 August 2012

Lining my Macaron

Quick post on how I lined the bodice for my Macaron.  I was originally going to line the whole dress, but I think I'll wear this most in the Spring/Fall, and I find lined skirts kind of hot and sticky.
 
 I decided to keep the facing, because I had put piping at the neckline, and I was worried that the bulk of the piping would cause problems without a facing.  I used the Threads article 'A shortcut to great linings' to combine the facing with the lining.   The colour at the lower edge of the facing is my serger thread.
As I said the the last post I combined the four bodice pieces into two (front and back), to limit bulk.  I think there might be a small dart (I didn't check the original pattern pieces) but it was no longer there after my alterations.  If there is one, it should be fairly simple to incorporate it into the bodice dart.
I sewed the front bodice to the back at the side seams and shoulder seams (except where the zipper is) and then fell-stitched the lining to the dress.  I used red thread for the hand stitching so I could see clearly what I was doing, and because I'm trying to improve my hand-sewing


Here's the back.  I would have had to use side darts for the upper bodice part, when I combined the two pieces, but I took out all the excess fabric, and it was pretty much straight.

After I attached the bodice pieces I attached the midriff band.  I sewed the side seam first, then hand-stitched it to the dress.  You can see the fell stitches pretty clearly, at this point I was rushing to get the dress done.

Sunday 19 August 2012

Sew Colette 2.0 - Macaron Completed!

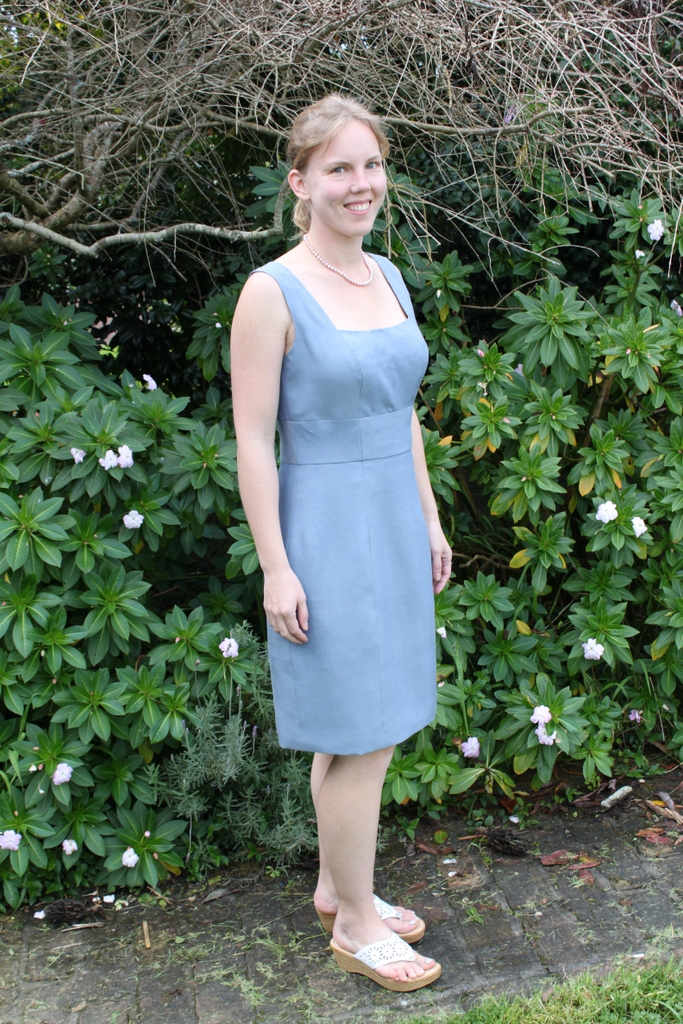
Here is my finished Macaron.
I had to jump ahead of the sewalong because I really wanted to wear it to Fabricabrac yesterday.  This meant that every night this week I have been feverishly slaving over the dress.  It _always_ takes me longer than expected, even though I made no mistakes on this one!

I made quite a few alterations to the pattern.  The muslin did not fit me at all.  I had to let the midriff out significantly (about 2 inches), tapered down to nothing at the upper bodice section.  I lowered the midriff front (sweetheart part) half an inch all the way across, and raised the centre back half an inch, tapering to lowered half an inch at the side seams.  This pinched an inch out of the back horizontally and got rid of all the bagginess I was having issues with.  Part of the issue with the midriff band was due to me making it 1/2 inch wider, but keeping the taper.  I ended up making the front band almost a straight piece instead of a curved piece. 
I wasn't happy with the skirt portion, the hips were more than 16 inches larger than the waist, and far too baggy on my tall frame.  I also was afraid the style was too young for me, and wanted to get rid of the pleats in the back.  I converted them to 1.5" darts, instead of 2" pleats, rotating 1/2" out to each side seams, and making the back 1" more narrow.  I also had intended to take 1" out of the front, but I can't remember if I did or not (d'oh).  Here is a better picture of the darts

The wrinkles are there because my dress form is not as pear shaped as I am.  It fits me much better than the form.

One of the worries I had about the pattern was that the top would look like a different item than the dress, especially since I wasn't doing the midriff band in the contrast.  To counteract this I put piping around the neckline and sleeves, which I think makes it look much more cohesive.  I also piped around the waistband, and the bodice piece.  I had originally planned on picking up one colour from the main dress fabric (red) and doing the piping in that, but thought it was more classic to make piping in the dress fabric itself.  I got the idea for the self-fabric piping from Sherry's great post on piping.  Here's a better picture:
 On the inside I lined the bodice section, combining the two bodice pieces into one each for the front and back, and inserted the lining using fell stitches.  I will put that in a separate post later, as this one is getting a bit long.

Here's one last picture of the zipper, so you can see the piping around the sleeve, and that I matched up the midriff bands.

I'm not too thrilled with my insertion of the zipper, it was pretty bulky with the piping and all the fabric, but it's on my side, so I'll just keep my arm down at all times.  I think in the future I'd insert the zipper before sewing the side seam at all (before the sleeve is in) so that I can make sure it's all lined up perfectly. 

Overall I love this dress, it's fun, the fabric is actually red, black and gold, the gold shows up much better in person.  I would be proud to wear it out, and am happy that my sewing skills are finally improving :) .  The pattern took a lot of work to make it fit, but it was well worth the effort. 

Saturday 18 August 2012

Fabricabrac!

Today Auckland had their first Fabricabrac.  It was awesome, tons of people, tons of fabric.  It's essentially a swap meet with people setting up tables towering with fabric.  There were lots of great deals.  I decided to set up half a table, in order to force myself to get rid of some of my stash.

Sorry for the crap pic, I only had my cell phone with me.  I sold my little singer 99K.  It was hard to let her go, but I still have my other four vintage singers to keep me company.  I only bought two pieces of fabric, and two patterns, but they were total scores.  I picked up a Vogue Couturier pattern and a Vogue Paris Originals - both in my size!  They are awesome, but I'm definitely saving them for when I'm a little more experienced.
 Vogue 1140, a great jacket and sheath pattern.  I love the slash that runs down the princess seam line, but ends just past the hips.  I think I'll try the sheath first, and then work my way up to the jacket.
 This suit is so cute, and chic.  The skirt is pretty standard, but I'd love to try the jacket.  It has 7/8 length sleeves. 
Here's a quick glimpse of what I wore today, my new Macaron!  After a long day it was a bit wrinkled.  Tomorrow when I have the time to iron it and take better pics I'll put up a special post just for it :)

Wednesday 8 August 2012

Sew Colette 2.0 - Macaron Update

hmm, I think that Colette Patterns may not be designing with my frame in mind.  I made up a muslin, and made a 10 grading to a 12 through the hips.  Unfortunately the waist was _tiny_  Here are some (cringing) pics.  


This was after I let the waist out an inch.  I think I'm accustomed to more ease in patterns, and I was a little vain in matching up my measurements.  As a warning, the midriff band seems to be designed to taper down, while my waist does not.  I had to de-taper the midriff band, making it much closer to a straight line.  I also shifted the bodice down half an inch on the front and up a half inch on the back, this helped get rid of a lot of the puffiness at the back.

Another issue I had was the pleats.  I appreciate the aesthetic that they're going for, but I am at a loss as to why I thought it might suit me.  The hips seem to be more than 16" larger than the waist, much more puffiness than I need.  I am tall.  Tall is not cute.  I tried the muslin on and it did not suit me.  I eliminated the pleats on the back, and changed them to darts (I do not need excess puffiness on my rear end).  I scaled down the front pleats by 1/4" each.  It was much closer to the silhouette that I'm comfortable with.

On the plus side, I'm now really happy with my muslin.  I'm a bit worried about the rear darts being pointy, but I should be able to get them into shape.  If anyone knows a good source for shaping rear darts I'd love to hear it :)

The Macaron is now cut out in the fashion fabric.  I've cut out bias strips for the piping, and have to wait until the weekend to buy cording and a zipper.  I'm trying to decide where to put piping.  I'm not doing a contrast waistband, so I thought I would put some on the top and bottom of the waistband.  Also on the sleeve hems and neckline.  Should I put some on the sweetheart bodice as well?